XAMPP安装和使用教程,(图文版)
XAMPP是一款非常优秀Apache+MYSQL+PHP的服务器系统开发套件,也是笔者用到现在为止感觉最好用的一款 APACHE+MYSQL+PHP套件了。同时支持Zend Optimizer,支持插件安装,目前最新xampp的版本是1.7.2。
官方网址:http://www.apachefriends.org
最新XAMPP v1.7.3下载(51M):下载XAMPP安装包(该安装包完全来自与官方链接,不支持工具下载)
支持操作系统:Windows 2000, XP (Server 2003), Vista (Server 2008),全部都是32位的,64位官方未测试。
XAMPP 1.7介绍特点:
XAMPP支持的操作系统包括:Windows、Linux、Mac OS X、Solaris;
XAMPP是否是免费的:XAMPP是完全免费的,并且遵循GNU通用公众许可
XAMPP目前包含的功能模块如下(Ver 1.7.3)
+ Apache 2.2.14 (IPV6 enabled)
+ MySQL 5.1.41 (Community Server) with PBXT engine 1.0.08-rc
+ PHP 5.3.1 + PEAR (PEAR, Mail_Mime, MDB2, Zend)
+ Perl 5.10.0 (Bundle::Apache2, Bundle::Apache::ASP, Bundle::Email, Bundle::DBD::mysql, DBD::SQlite)
+ XAMPP Control Version 2.5.8 (ApacheFriends Edition)
+ XAMPP CLI Bundle 1.6
+ XAMPP Port Check 1.4
+ XAMPP Security 1.1
+ SQLite 2.8.17
+ SQLite 3.6.16
+ OpenSSL 0.9.8k
+ phpMyAdmin 3.2.0.1
+ ADOdb v5.09a
+ FPDF v1.6
+ Zend Framework 1.9 Minimal Package (via PEAR)
+ Mercury Mail Transport System v4.62
+ msmtp 1.4.17 (a sendmail compatible SMTP client)
+ FileZilla FTP Server 0.9.32
+ Webalizer 2.21-02 (with GeoIP lite)
+ Xdebug 2.0.5 for PHP
+ eAccelerator 0.9.6-rc1 for PHP
+ Ming 0.4.2 for PHP
+ PDF with pdflib lite v7.0.4p4 for PHP
一、XAMPP的安装过程
XAMPP的安装过程很简单(是指exe安装包过程,解压包等就更简单一点,游子实测Windows XP环境下),但需要注意的两点如下
1、安装路径,最好放置到D盘,不建议不要放到系统盘去,尤其是早期的XAMPP版本可能默认安装Program files下可能在Vista、Windows 7可能需要修改写入权限。下图所示(只需要选择驱动器,安装程序会自动创建xampp目录),然后点install,等候安装完成。
2、安装完成后,会弹出COMMAND设置窗口,问我们是否创建桌面快捷方式,我们选择Y并回车。

3、接下来问我们是否定位xampp的正确路径,Should I locate the xampp path correctly选择y并回车
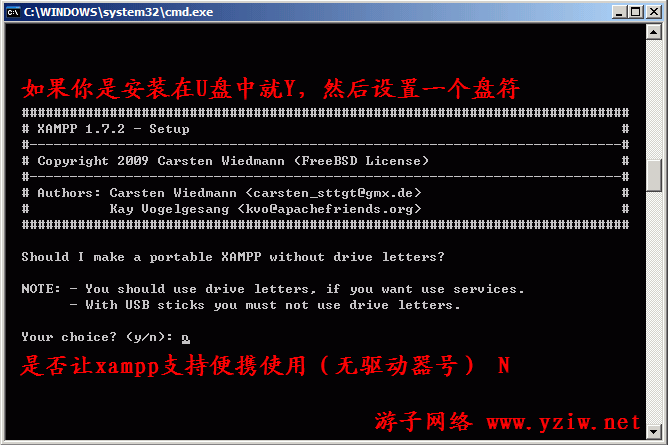
4、选择是否让xampp支持便携使用(无驱动器号),这里要注意,如果后面想把XAMPP注册为系统服务的话,是必须使用驱动器号的,如果要使用USB 安装xampp就不能使用驱动器号,因为USB设备可能在不同PC机上的设备号可能有所变化选N并回车。

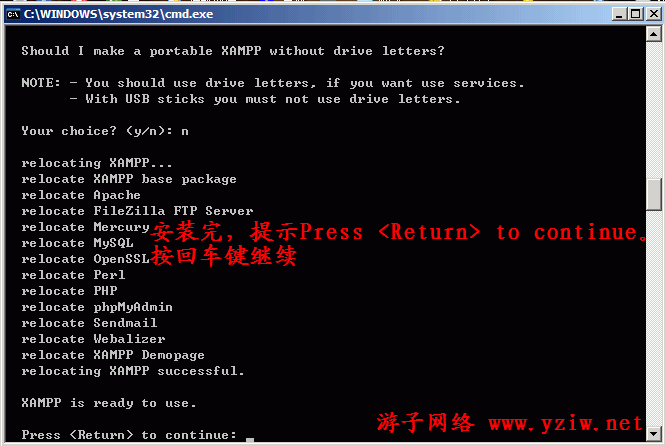
5、安装完,提示Press <Return> to continue。按回车键继续

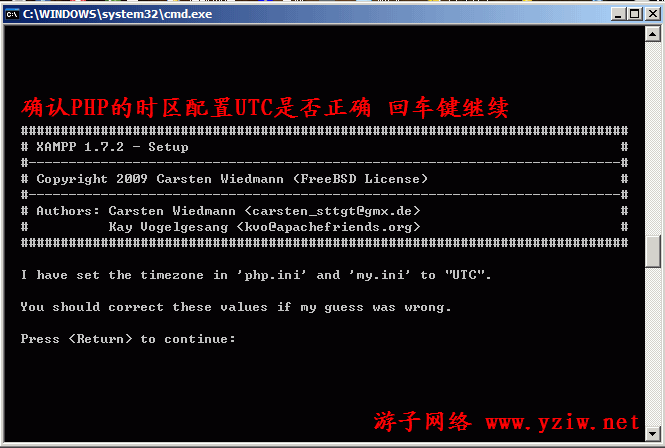
6、这一步让我们确认PHP的时区配置UTC是否正确,这个没关系,即使后面发现正确,也可以自己在PHP.INI里修改掉再按回车键继续。

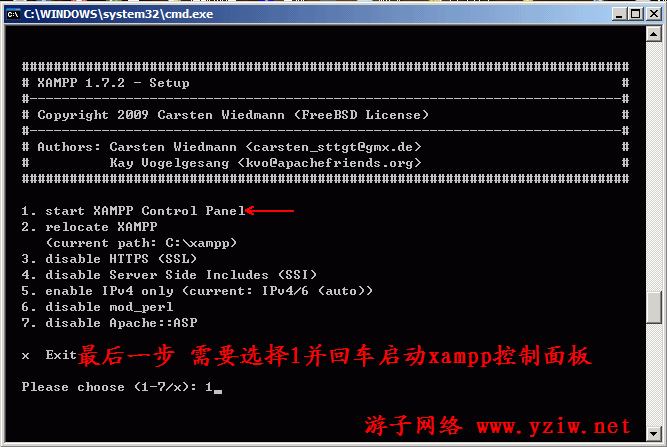
7、这里是最后一步,如下图,我们只需要选择1并回车启动xampp控制面板,右下角的托盘中已经有了xampp控制面板启动程序。

9、到这里xampp就安装完成了,如果出现xampp安装失败,请先运行安装一半的xampp目录下的卸载文件uninstall_xampp.bat执行一次清理,然后再重新安装。
10、输入127.0.0.1 或者 localhost 就可以看到安装成功的欢迎页面!然后点中文
11、XAMPP for Windows 详细信息!
这就是后来安装成功的WordPress3.0
二、XAMPP的基本常见使用方法
1、XAMPP的启动路径
xampp\xampp-control.exe
2、XAMPP服务的启动和停止脚本路径
启动 Apache 和 MySQL:xampp\xampp_start.exe
停止 Apache 和 MySQL:xampp\xampp_stop.exe
启动 Apache:xampp\apache_start.bat
停止 Apache:xampp\apache_stop.bat
启动 MySQL:xampp\mysql_start.bat
停止 MySQL:xampp\mysql_stop.bat
启动 Mercury 邮件服务器:xampp\mercury_start.bat
设置 FileZilla FTP 服务器:xampp\filezilla_setup.bat
启动 FileZilla FTP 服务器:xampp\filezilla_start.bat
停止 FileZilla FTP 服务器:xampp\filezilla_stop.bat
3、XAMPP的配置文件路径
Apache 基本配置:xampp\apache\conf\httpd.conf
Apache SSL:xampp\apache\conf\ssl.conf
Apache Perl(仅限插件):xampp\apache\conf\perl.conf
Apache Tomcat(仅限插件):xampp\apache\conf\java.conf
Apache Python(仅限插件):xampp\apache\conf\python.conf
PHP:xampp\php\php.ini
MySQL:xampp\mysql\bin\my.ini
phpMyAdmin:xampp\phpMyAdmin\config.inc.php
FileZilla FTP 服务器:xampp\FileZillaFTP\FileZilla Server.xml
Mercury 邮件服务器基本配置:xampp\MercuryMail\MERCURY.INI
Sendmail:xampp\sendmail\sendmail.ini
4、XAMPP的其它常用路径
网站根目录的默认路径:xampp\htdocs
MYSQL数据库默认路径:xampp\mysql\data
5、日常使用只需要使用XAMPP的控制面板即可,可以随时控制apache、PHP、MYSQL以及FTP服务的启动和终止。上面的 Service是为了在安装后方便随时可以注册或卸载上文提到的服务项目。
四、附xampp的默认密码
1、 MySQL: User: root Password:(空)
2、FileZilla FTP: User: newuser Password: wampp
User: anonymous Password: some@mail.net
3、Mercury:
Postmaster: postmaster (postmaster@localhost)
Administrator: Admin (admin@localhost)
TestUser: newuser Password: wampp
4、WEBDAV:User: wampp Password: xampp
来源:http://www.yziw.net/archives/1605.html相关文章
- 在Linux上安装和使用xampp教程(2011-10-2 1:3:30)
- xampp 访问出现New XAMPP security concept:(2011-10-2 1:0:22)
- PHP版本中线程安全和非线程安全的区别(2011-4-22 11:6:48)
- PHP 网站如何解决网站大流量、高并发的问题?(2011-3-24 17:24:44)
- PHP的header location重定向语句对页面进行跳转失败的原因(2010-12-29 17:1:32)
- 【KingCMS】KINGCMS PHP版的标签调用说明(2010-10-8 23:3:27)


